Once again, this is a post to complement one of my workshops, this one about Manual Exposure. Obviously! Although it’s a companion reading material to the workshop, you can certainly use it as a complete lesson in itself. It’s an easy reading and an ideal starting point to explore the wonderful world of manual exposure!
Manual exposure is a very broad subject, and I’m not even talking about the complete manual operation of the camera, which would include other aspects that are not directly related to the act of exposing a photograph, but it certainly influence the final result, such as manual focus and white balance for example. I’m focusing solely on the exposure procedure and adding some essential information such as light metering – which has its own expanded workshop. Now that the scope of this post is clearly defined, let’s get started!
The act of exposing a scene to take a photograph is essentially the process of determining the value of three components: Aperture, Shutter Speed and Light Sensibility (ISO). All three values are correlated, meaning the adjustments you do in one, can affect the other two. I say “can affect” because, ultimately, is the photographer’s decision how to determine the values in order to achieve a desired result.
If you set the camera to operate in automatic exposure mode, the camera will always determine the correct values to achieve an optimal exposure based on the light metering readings. If you control the exposure, by manually determining one, two or all three values, you can achieve an exposure that is not optimal, but neither is wrong. For example, you may want your final image to be darker, or lighter, than the optimal exposure would result, and that is a deliberate choice, not a mistake.
You can also adjust one of the values – and do the required compensations in another, or both other values – to achieve a different optimal exposure, than the default results achieved by the automatic mode. For example, you can change your aperture settings to modify your depth of field. Or you can change your shutter speed settings to blur movement. Variations in the exposure settings like these, are subject of their own workshops, but we’ll briefly talk about them this time as well. This process of changing one value and adjusting the other value – or values – to achieve the same exposure value is called “reciprocity”. Hang-on, “Exposure value” !? Don’t worry, we’ll get there.
Measuring Light & Exposure Values
Before we dive into manual exposure settings, we need to talk about light metering. All modern automatic cameras have a built-in reflected light meter that can measure the light reflected from a subject, in at least three different modes. The first mode is the evaluative mode, where the light meter measures the overall light over a scene and calculates an average value. It’s a good option for landscape photography for example, where the subject is the complete scene.
The second mode is the centre-weighted evaluative mode, which works in the same way, but it gives more weight to the centre of the scene when calculating the average value. A good option for a wide shot of a single subject, like a person in front of a large area.
And the third is the spot mode, which measures the light in a single spot. Older models only had one spot, in the centre of the frame, but with technology advancing, other spots were added, covering a broader area of the frame, always near the centre. Nowadays, some cameras offers in excess of tens of spots, covering almost the entire frame, and you can select just one of them to take your measure. It’s a good option for a small subject within a large scene, specially if it’s not in the centre of the frame and your camera offers several spots for you to choose. Don’t mistake it for the focus points, also spreaded out through the frame and used to focus in a single spot.
Modern and advanced cameras also have a matrix, or zone, mode. This mode is very efficient as it measures the light in different parts of the frame using artificial intelligence to analyse the results and to calculate an average value. It works much like the centre-weighted mode, but different in the way that takes sample readings of a larger part of the frame, and that it uses AI to calculate the final results, not just attributing a higher weight to the centre of the image.
Here I’ll need to jump over the theory and go straight to the facts of life! The mix of colours in an average image is equivalent to 18% grey under perfect light conditions, whereas 0% is pure white and 100% is pitch black. The light meter, in whatever model or mode, reads the light and suggests settings that would expose correctly an average scene, meaning, it will bring everything to 18% grey under perfect light conditions . It will work most of the time – after all, it is the average result.
But what happens when you point your camera – or manual light meter – to a crow, spot on? You will have a greyish, washed out crow, in a blown out white image. That happens because the camera will expose the black crow to look like an 18% grey crow, and incidentally, blowing out the brighter parts of the scene. You can minimize, or avoid (depending of the quality of your camera), these wrong exposure settings by using the evaluative mode or, compensating the exposure manually.
And what about that idyllic fresh white snow covering a field in a crispy clear winter morning? It will show up as a dirty muddy field in an overcast day in the shot. Why? That’s right, the camera will try to make it looks like an 18% grey snow, instead of pure white. This time, whatever mode you use, will yield similar results, unless you have a high quality modern digital camera, capable of doing the correct exposure compensations using advanced artificial intelligence. Or, you do it manually.
Very quickly; when using manual light meters, you must first enter the ISO setting, and then the desired value for either shutter speed or aperture – usually the shutter speed – and after taking the light reading, the meter will give you a suggested value for the third component – usually the aperture. But, depending on the model, it will give you an exposure value, instead of shutter speed and aperture settings, especially spot meters. Camera’s built-in light meters, which work the same way as spot meters, will provide you with exposure values. But what are exposure values?
Once again I’ll need to skip past most of the theory, but in summary, exposure values are combinations of aperture and shutter speed settings. To simplify things, we can forgo the combinations and understand that they can be used as incremental values, where “0” would be the optimal exposure; EV1 would be 1 stop brighter and so forth and EV-1 would be 1 stop darker and so forth. Got it?
Going back to the camera’s built-in light meters, they will show a scale centred on “0”, the optimal exposure, with positive and negative values on either side (of course!!). If, when doing a light reading in manual mode, the indicator moves to the right, it’s because the current settings are resulting in a brighter exposure; in this case you should either diminish the aperture, or increase the shutter speed, to bring it to “0”. If the indicator moves to the left, the resulting image will be darker, then you should either augment the aperture, or slower the shutter speed, to bring it to “0”. Don’t worry, we will understand how aperture and shutter speed works in a moment, this is just to clarify how the cameras’s built-in light meter works.
So, to wrap-up light metering, the first step to expose a shot is to measure the light. Your camera has a built-in light meter that will do it in three different ways, depending on the type of scene you’re composing, and provide you with an exposure value that will guide you to achieve the optimal exposure, or you can make the proper adjustments depending on the situation, or on your creative desires.
Light Sensibility (ISO)
The first component we’ll understand is the light sensibility, which is defined by the International Standardization Organization, common known as ISO. In the older days, light sensibility for films were classified according to a variety of standards, the most popular were ASA and DIN. In 1974, ASA and DIN were combined to create the ISO standard. Ok, enough of that.
Low ISOs, have lower light sensibility, and vice-versa. Meaning, if you are shooting a bright scene, with lots of light being reflected to your camera, you will need a low sensibility setting. If you’re shooting a darker scene, like at night, you will need a higher light sensibility setting. Got it?
The usual lowest light sensibility setting is ISO 100, used in sunny days or in any scene with an abundance of light. Advanced cameras may offer lower settings such as ISO 50 or even lower, like ISO 25.
Older digital cameras were limited around ISO 800 for their highest setting. Actually, they would offer higher settings then 800, but with very poor results. High ISO settings are susceptible to introduce noise in the captured image, much like high speed (ISO) films are prone to introduce grains during the development process of the film. Modern digital cameras are much more efficient, reaching ISOs such as 25000 or even higher in some cases, with high quality results.
When shooting film, you’re stuck with a single film speed (ISO 100, 200, 400, etc) for the entire roll of film, whatever it may be – 24, 36, or any other number of exposures. Digital photography allows you to adjust your ISO settings for each shot.
Shutter Speed
Shutter Speed is the camera’s component of the exposure process. It measures the length of time that the camera shutter is open in fractions of seconds. The lower the fraction, the lower is the shutter speed and incidentally, higher is the length of time it remains open. A shutter speed of 1/60 of a second will keep the shutter open for 0.016s, and a shutter speed of 1/125 of a second will keep it open for 0.008s.
The camera’s shutter is closed in its resting position, and when you are taking a photo, by pressing the shutter button, you’re opening the shutter to allow the passage of light to expose the film or digital sensor. The length of time you keep the shutter open, determines the amount of light used to expose the photo. Longer lengths of time, higher amounts of light, and vice-versa.
When hand holding the camera, 1/30s is the usual longest exposure you can take to avoid blurring your shot. When using a tripod you can go for longer exposures such as 1/6s, 1/3s, and so forth. Exposures of 1s or longer are known as “Long Exposures”, necessary in very dark conditions with low light sensibility settings, or when using filters to reduce the light to allow a long exposure to intentionally blur movement.
Aperture
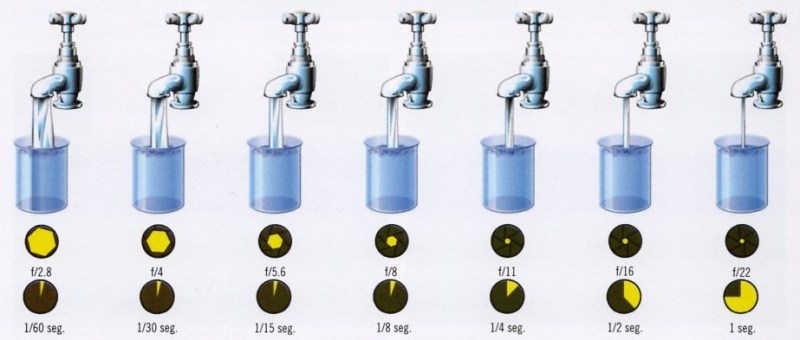
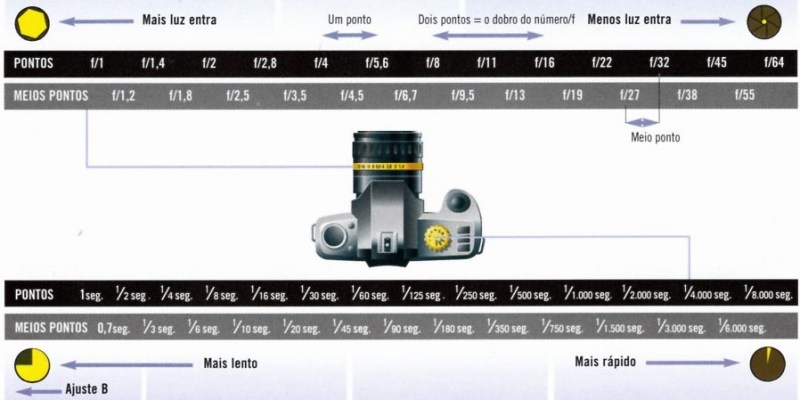
Aperture is the lens’ component of the exposure process. It’s defined by the internal diameter of the lens – the tunnel where the light pass through to reach the sensor. Most lenses do not have a fixed aperture – in fact just a few of them have. We can adjust the aperture by augmenting or diminishing the diaphragm – an internal mechanism – and thus, control the amount of light going through the lens. The diaphragm’s design will vary, but they all work roughly the same way – they all have the same purpose after all. Aperture is defined by “f” numbers, such as f/2.8, f/5.6, f/8, f/16, f/22, etc.
The lower the “f” number, the larger is the aperture, and vice-versa. To understand this concept we need a bit of geometry class. The internal diameter of the lens can be measured by dividing the lens’ focal length by its “f” number. For example, a 500mm f/8 lens has a focal length of 500mm and an aperture of f/8, thus its internal diameter is 62,5mm (=500/8).
But, as I said before, most of the lenses has an adjustable aperture, and you do it by controlling the internal diameter through the diaphragm. A 50mm lens with an aperture set to f/2.8, will have an internal diameter of 17.85mm; but if you change it to f/5.6, the internal diameter will decrease to 8.9mm. Meaning, an aperture of f/5.6 will allow less light passing through, than an aperture of f/2.8, on the same focal distance lens. As you can see, the higher the “f” number, the lower is your aperture.
But we don’t go about doing calculations and talking of how many millimetres a lens has internally. We just use the “f” numbers, also known as “f” stops.
Stops
“Stops” are how we describe the increments (or decrements) of exposure values, aperture, shutter speed and light sensibility. In exposure values, to go up one stop, you need to add +1EV; to go down one stop, you need -1EV.
In light sensibility (ISO), to go up one stop you need to double the nominal value, and to go down one stop, you need to halve the nominal value. For example, ISO 400 is one stop higher than ISO 200. Simple like that.
Shutter speed is also very simple, but some people forget that the nominal values are shown in fractions, and get confused. To increase one stop, you need to double the exposure time, and to decrease one stop, you need to halve it. For example, 1/60s is one stop lower than 1/30s. Remember: Fractions!
Aperture is a bit tricky, but also very simple once you understand the basic concept. Going a bit deeper in our geometry class, we can calculate the area of the lens’ internal diameter. Why would we do it? Because to know how much light is effectively passing through the lens at one given moment, we need to know the area of the light’s path. The area of a circle is calculated as the square of the radius (half of the diameter) times π.
But we really don’t need to do any of this calculations in actual photography! We just need to understand that to double the size of the area, you must multiply the radius with the square root of two, which is 1.41. This is why the factor between consecutive f-stops is roughly 1.4, and not nominal doubles or halves.
All right! Now, to manual exposure! Finally!
Manually Exposing a Shot
Now, we will put together everything we’ve learned so far! The first step is to visualize your final image. For that, you must choose your subject, and at least, have a rough idea of how you’ll compose your shoot. That includes some exposure decisions, such as exposure values, depth of field and capture of movement.
When you have your final image in your mind’s eye – the process of visualization – you’ll need to determine your ISO settings, depending on the light conditions. Always try to work with the lowest ISO setting as possible.
Next, you’ll compose your shot, and input the initial settings for aperture and shutter speed in your camera – you will do it based on the experience you’ll acquire with lots of practice. Initially you can use the “Sunny 16” rule – see the info at the end of the post. After composing your shot and setting the initial values, press the shutter button half way through, to measure the light. The camera will tell you how much way out of the optimal exposure – or spot on, preferably – you are with the current settings.
If the light meter indicator is to the right of the scale you can either increase the shutter speed or diminish the aperture settings, or both, depending on your needs. Remember that, to reduce the time that the shutter is open, you need to increase your shutter speed and; to diminish the aperture, you need to select a higher “f” number, thus reducing the internal diameter of the diaphragm . Both actions will allow less light to reach the digital sensor, therefore, decreasing the exposure value.
If the light meter indicator is to the left of the scale, you will need to do the opposite of everything. You will need to augment the aperture, or slower the shutter speed, to allow more light to reach the sensor, thus increasing the exposure value. Easy-peasy!
Of course, how you adjust your exposure will depend on how you’re visualizing your final image. You may want your image to be a tad dark, or bright; then you will want to keep the indicator to the left, or right, of the centre (optimal exposure). Remember, the camera will always suggest an optimal exposure, bringing everything closer to 18% grey in perfect light conditions. So, if your desired final image is a bit dark, you won’t want it to be brighter, and vice-versa.
And that brings us to the final aspect of manual exposure: Exposure Compensation. If you understood everything we talked about so far, exposure compensation will be a piece of cake. It is what the name says, you use it to compensate the exposure values for one side or the other of the scale. If you want your image to be one stop darker than the optimal exposure value, you set it to EV-1. If you want your image to be one stop brighter, you set it to be EV1. Just like that!
And that’s it! Now you’re no longer a beginner in manual exposure, you’re ready to become an expert – you just need to practice a lot by taking tons of photos!
I hope this post will help you to enter the wonderful world of manual photography and to achieve great results with every little bit of extra practice you put into it. I jumped over lots of theory to write this post, but honestly, every information that you need to move forward is here. Of course it would help you to be a better photographer by diving deeper into the theory, but if this is not your thing, don’t worry, just go practice and you’ll be fine.
Please let me know if you liked it, and if you have any questions. I’ll try to help you as much as I can. Good luck and good shots!
PS: All graphic images used above are from the book “The New Manual of Photography” by John Hedgecoe. This is one of the many books I used to learn photography, and one of the easiest to understand when you’re starting. Some of the info about equipment is quite outdated, but the theory is what matters.
“Sunny 16”
The rule “Sunny 16” is a practical rule from the old times of film photography. It goes like this: You set the shutter speed with a nominal value equal (or approximate in some cases) to the ISO value, and then adjusts your aperture depending on the light conditions.
For example, if you are using a roll with an ISO 100, you set your shutter speed to 1/125s, and then adjusts your aperture depending on the light conditions. Under a bright sunny day, your aperture will be f/16, hence the name of the rule.
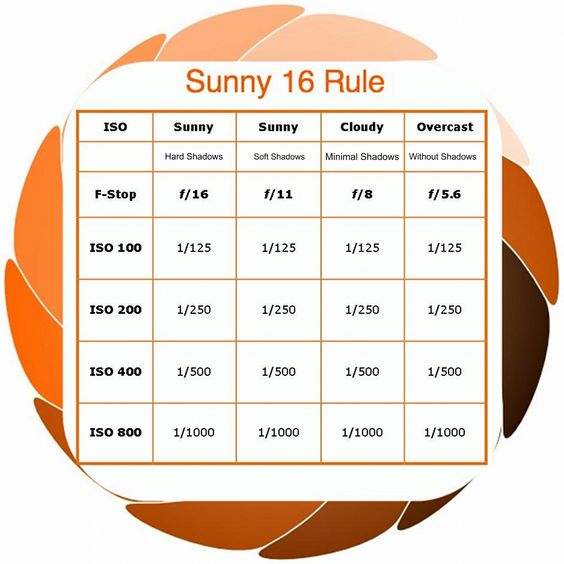
You can use different shutter speeds – or apertures – depending on your needs, and then adjusting the other value accordingly to achieve the same exposure value. In digital photography, you can also achieve the desired exposure value after changing one or both of the settings, by changing your ISO – which could not be done in film photography. Remember: “Reciprocity”! I will talk more about reciprocity in the meetings/workshops/posts about “Capturing Movement” and “Depth of Field”. Stay tuned!
PS: If you’re from Portsmouth or nearby, get in touch so you can take part in one of the meetings or workshops that I organize!
That’s all for now, see you in the next post! Cheers!
Carlos Alexandre Pereira
Urban explorer, travel and architectural photographer. Film and digital user, preferably B&W. Online/digital writer and publisher. Photography educator. Fine art prints available in limited editions.

